Does a Metal Underground Water Pipe and Ufer Ground Have to Be Continuous
Follow 8 rules for safe and long-lasting underground conduit installation. These rules apply to both industrial and at-home projects.
In my discussion, I'll reference the National Electrical Code (NEC). And I suggest you follow up on my references, to gain greater subject insight. Also, check out my electrical conduit guide for added information and tips.
Most importantly, hire a professional for your electrical work, if you lack experience.

Important Note: before any underground work, contact your local utility. They'll provide you with the location of any buried conduits. This is a required safety precaution before you ever pick up a shovel.
Also, use 811 "Call Before You Dig." You can look up your state to learn about your state-specific laws and processes.
#1 Bottom of trenches
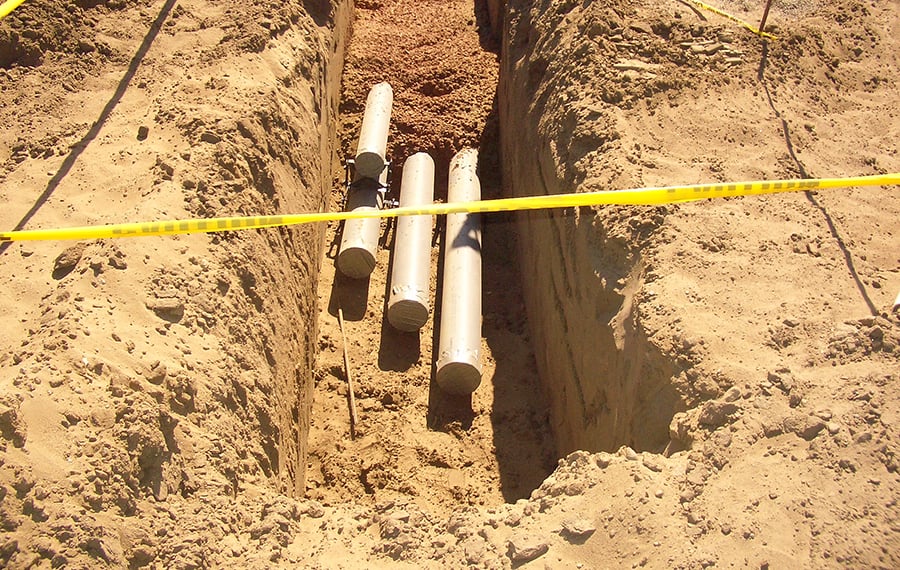
After digging your trench for your conduits, the following are 3 things you must do:
1) Remove all hard and sharp materials
Be sure your trench is free from rocks, clods, and foreign material. Any hard objects can damage conduits. It only takes a small micro-fracture in a conduit for water to penetrate.
Important Note: an underground conduit is prone to water penetration. The hydrostatic pressure plus water surface tension leads water into small conduit holes. In other words, water travels to the lowest pressure areas.
To point out, water penetration is common in underground conduits. You just don't want your cables and wires in conduit compromised.
Say a coaxial cable is in your underground conduit without a water-resistant shield. If water enters the conduit, it'll seep into the tiny pinholes in the cable jacket. The cable shield will then saturate causing corrosion. In return, the resistance of the shielded cable increases, causing greater cable losses. The end result is a poor signal.
I must say, all buried cables and wires should be water resistant. But even water-resistant cables and wires can become damaged. I've seen rodents enter conduits from large cracks and chew up cables.
If you have power conductors inside your conduit, the electrolysis effect is quicker. This is because of the increased current. You can combat such damage though by using cathodic protection.
2) Compact and level soil
First, make your trench sides as vertical as possible, with limited sloping. Then make sure the bottom of your trench is compact and level. You want uniform bearing and support for each conduit section you install.
Differing soil elevations can add stress to a conduit in backfilling. The stress then leads to conduit damage as we discussed in the previous section.
Important Note: the bottom of a trench can be soft or rocky. Just remove the unsuitable material to a depth of at least 6-inches. Then replace with crushed rock, sand, or gravel as appropriate.
3) Dewatering
Keep your excavation zone free from water during construction. You want the static water level drawn down to a minimum of 2 feet below the bottom of excavations. This will maintain the undisturbed state of natural soils. Also, it'll allow for the proper placement of any stable fill.
For more information on dewatering, read here.
Important Note: control groundwater to prevent softening of the bottom of excavations. At the same time, be sure dewatering systems don't remove natural soils.
#2 Freezing locations
In very cold regions, install your conduit below the frost depth. This will help prevent the freezing of any water, which enters your conduit. Also, this prevents conduit damage from thermal expansion and contraction.
If your frost depth is 8-feet below grade though, the installation may not be practical. In these instances, first, check with your local jurisdiction in charge. If you live in a very cold region, I'm sure guidelines exist for best installation practices. But if you don't receive helpful feedback, all hope isn't lost. There's a great hack I like to use.
Install a layer of rigid insulation above your conduit in the area you've excavated. This will help prevent the frost from penetrating any deeper into the soil. For example, use 1-inch rigid insulation. This insulation is equal to roughly one foot of regular soil depth. So if your frost line is 5-feet below grade, install the 1-inch thick insulation at the 4-foot mark.
Next, a segment of your conduit will eventually rise above grade through the frost. This conduit segment is most prone to damage. So add expansion fittings on the vertical riser portions, to allow for settling.
Important Note: temperature swings are typically much less underground. You may have a 10°F swing underground versus 100°F above ground. Also, the temperature swings underground are much slower.
Extreme temperature swings cause conduit damage from expansion and contraction. This is one reason to add expansion fittings on vertical risers, to allow for settling.
#3 Conduit spacers
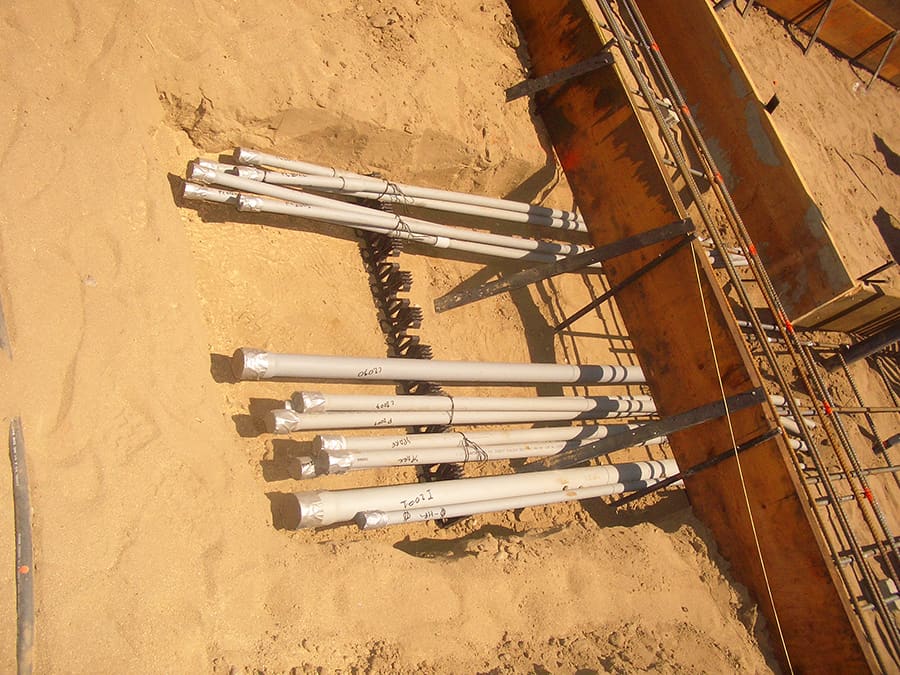
When you have two or more conduits, install molded plastic spacers every six feet. This helps prevent the sagging and deforming of conduits.
Then for power conduits, a 3″ separation between conduits is best practice. This will maintain the current carrying capacity of your conductors. Refer to NEC section 310.15(B)(2)(a). Plus, you'll maintain a constant impedance across your wires and avoid hot spots. Hot spots will over time break down your wire's insulation and cause ground fault issues.
Finally, use spacers if you're vertically stacking your conduits while using flowable fill. Flowable fill is a self-compacting cement-type material, used instead of compact fill. The spacers allow for proper compaction around conduits. This prevents conduits from floating during concreting.
#4 Backfill material
Proper backfill is critical to installing conduit. Because in your native excavated soil, you'll typically find small and large rocks. As we discussed, you don't want any damage inflicting material around your conduit.
To better explain, we'll go over the three backfill material layers.
Bedding material
This is the material used to refill a trench from the trench bottom to your conduit bottom. You want to use granular material free from organic matter. The material should have a sand equivalent value of not less than 20. The material should also conform to the following table:
| U.S. standard sieve size | Percent by weight passing |
|---|---|
| 3/4 inch | 100 |
| No. 4 | 35 - 100 |
| No. 30 | 20 - 100 |
| No. 40 | 20 - 100 |
The coefficient of uniformity should be 3 or greater. This makes clean natural sand and gravel as usable options. Also, trench excavation is usable too, or a mixture thereof, with a sieve no greater than 200.
Important Note: don't use crushed concrete or reclaimed asphalt. Use material consisting of either sand-sized particles or sand-sized particles mixed with gravel, crushed gravel, or crushed stone.
Intermediate backfill
This is the backfill from the conduit bottom to 12 inches above the conduit. This material is the same as the bedding material.
Backfill material
This is the material used to refill the rest of the trench. The largest size of stone in this backfill shouldn't exceed 3 inches. Also, the backfill material should meet the following requirements:
- Non-expansive in nature
- Have a plasticity index of less than 8
- A liquid limit less than 30
- An organic content less than 3.5 percent
If the material excavated from the site meets these requirements, use it as backfill.
Important Note: dumping dirt over conduits while using spacers can cause damage. Because the poured dirt will create air gaps. The entire weight of your fill and the above traffic will then fall on your conduits. A better option is fine granular materials.
Concrete works as well as it's fluid, and it'll flow around conduits filling almost all air gaps. Then tamping the poured concrete will fill any remaining air gaps.
#5 Backfill compaction
After backfilling the soil in your trench, compact the soil. This makes the soil denser and thus reduces air gaps and the rate of water infiltration. Use one of the following mechanical methods to compact the loose backfill material:
- Compactor
- Excavator
- Jumping jack type compactor
You want to compact to the minimum required percentage of maximum dry density. The Proctor test ASTM D698 Method A dictates the values.
To point out, the backfilling process happens in the following layered steps:
- Backfill in 4 to 6-inch layers
- Compact with the appropriate compactor (e.g. 1,200-pound compactor)
- Add water to help with the compaction
Important Note: backfill needs to be mechanically compacted. T he level of compaction needs to match the density of surrounding undisturbed soil. Avoid m echanical compaction within twelve inches of conduits.
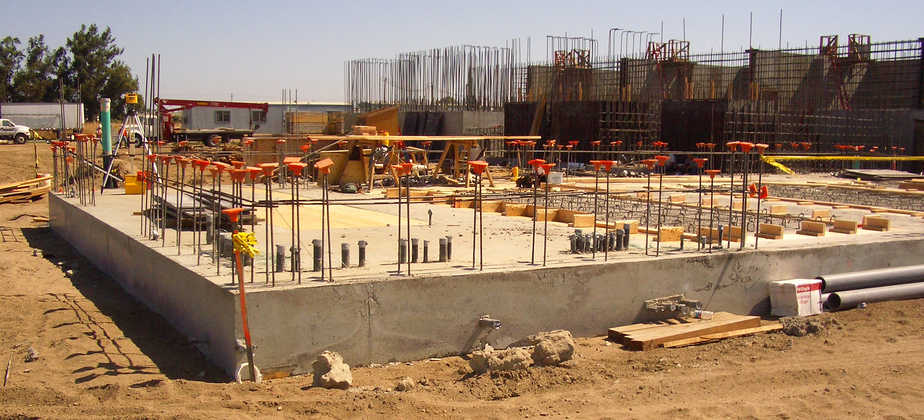
#6 Conduit installation depth
Conduit installation depth should typically meet the following guidelines:
- The top of conduits to be a minimum of 24 inches below finished grade for circuits 600 volts and below
- The top of conduits to be a minimum of 36 inches below finished grade for circuits above 600 volts
These burial depths will protect the public from exposed conduits. But also, it'll prevent damage to the conduits from routine shoveling. Now, of course, you can install deeper, which I don't recommend if not required. Because it'll later become more difficult to find the conduits.
Refer to NEC Table 300.5 for the minimum coverage requirements for buried conduits. You'll find many other underground conduit installation case scenarios listed.
Important Note: typically the worst corrosion area is near the soil surface. More specifically, the first few inches below grade where a conduit turns up. This is where a conduit is in contact with corrosive agents in the soil and exposed to oxygen.
For this reason, conduit entering the ground shows the most corrosion. Because travelling lower underground, the soil becomes more tightly packed trapping out air.
As a tip, wrap the conduit riser segment with plastic tape for added corrosion protection.
#7 Concrete encasement
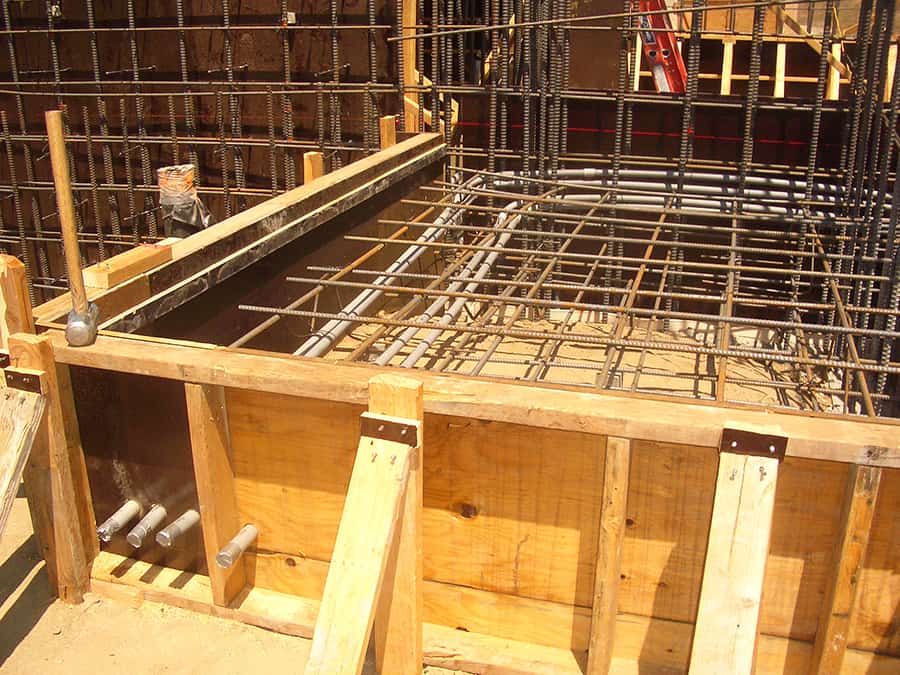
Encase conduit in concrete in the following scenarios:
- High chance for soil dig-in
- Likelihood of soil cave in
- Presence of vehicular traffic
For added information, check out the below table. It's a general overview of how to approach different installations, including concrete encasement. Keep in mind though, much of the table is subjective but best practice.
| Direct burial rated cable | Direct buried non-metallic conduit (PVC) | Concrete encased rigid galvanized steel conduit | Concrete encased non-metallic conduit (PVC) | Concrete encased cable | |
|---|---|---|---|---|---|
| No vehicle traffic | Bad design, but allowable per NEC | Acceptable design & allowable per NEC | Acceptable design allowable by NEC, but not NEC requirement | Acceptable design allowable by NEC, but not NEC requirement | Bad design & not allowable per NEC |
| Regular city vehicle traffic | Bad design, but allowable per NEC | Acceptable design & allowable per NEC | Acceptable design allowable by NEC, but not NEC requirement | Acceptable design allowable by NEC, but not NEC requirement | Bad design & not allowable per NEC |
| Heavy oversized equipment traffic | Bad design, but allowable per NEC | Not recommended design, but allowable per NEC | Highly recommended design allowable by NEC, but not NEC requirement | Highly recommended design allowable by NEC, but not NEC requirement | Bad design & not allowable per NEC |
Next, keep at least 4 inches of concrete separation between the earth or water and conduit.
The concrete is to be three-sack, 'lean mix.' It should contain 10-pounds of red oxide pigment per cubic yard.
Important Note: use reinforcing steel in concrete encased conduit runs of three or more. Reinforcing steel to be #4 bar, continuous, run linearly with the conduits. Place reinforcing steel at all four corners, with four inches of concrete cover around conduits.
Install #4 bars a maximum spacing of 12 inches on center, between adjacent steel lengths. Then place #4 bar circumferentially around the duct cross-section, at intervals not exceeding 24 inches.
To point out, concrete is somewhat alkaline, and it's a good chemical buffer. So, it won't cause much damage to galvanized steel, but the zinc coating will take a visual hit.
Just as important, concrete is porous like a sponge. If it's overly wetted with a compound bad for steel, the concrete will over time damage your conduits. This is a good reason to concrete encase PVC conduits.
#8 Extra underground conduit installation guidelines
The following is a best practice guide to follow:
A) Slope all outdoor underground conduits away from buildings and underground structures, toward pull boxes or manholes.
B) Avoid and/or prevent damage to existing underground piping, conduits, and cables.
C) Some installations require the removal of existing pavement or concrete slabs. At the end of your work, repair them as required.
D) Take proper precautions to prevent dirt, concrete, or trash from entering conduits. This includes entering inside fittings and boxes.
E) Install a pull rope in each empty conduit run. The rope needs to be the polypropylene type at least 3/16 inch in diameter.
F) Identify conduits with identification plates at terminations, enclosures, and wall and floor penetrations.
G) Provide the minimum separation for instrumentation conduits from power conduits as follows:
| Voltage | Separation (inches) |
|---|---|
| 120 Volts | 12 |
| 240 Volts | 24 |
| 480 Volts | 36 |
| Above 600 Volts | 72 |
H) Place caution tape at least 12-inches above underground installations, not concrete encased. Refer to NEC section 300.5(D)(3).
The tape will typically read the following:
"CAUTION BURIED ELECTRIC LINE BELOW"
Important Note: for buried conduits, the warning tape should meet the following requirements:
- Polyethylene plastic and metallic core or metallic-faced, acid-and alkali-resistant material
- Minimum width of 3 inches
- Warning tape placed on a roll
- Color-coded for the intended utility
- Warning and identification imprinted in bold black letters continuously over the entire tape length
- Permanent color and printing, unaffected by moisture or soil
Underground conduit installation wrap up
With underground conduit installation, there's much more than meets the eye. Just always remember though, to follow any local rules and guidelines. And if you ever get stuck, even as a professional, ask for help.
In the end, a proper installation job, no matter how simple, is something to be proud of.
What other best practice rules do you use in underground conduit installation? What do you find to be the biggest challenge with underground conduit installation?
Koosha started Engineer Calcs in 2020 to help people better understand the engineering and construction industry, and to discuss various science and engineering-related topics to make people think. He has been working in the engineering and tech industry in California for over 15 years now and is a licensed professional electrical engineer, and also has various entrepreneurial pursuits.
Koosha has an extensive background in the design and specification of electrical systems with areas of expertise including power generation, transmission, distribution, instrumentation and controls, and water distribution and pumping as well as alternative energy (wind, solar, geothermal, and storage).
Koosha is most interested in engineering innovations, the cosmos, our history and future, sports, and fitness.
Source: https://engineercalcs.com/underground-conduit-installation/
0 Response to "Does a Metal Underground Water Pipe and Ufer Ground Have to Be Continuous"
Post a Comment